Rich & Creamy Chocolate Cheesecake

I remember the first time I baked this chocolate cheesecake—it was a rainy afternoon, and I spilled a bit of chocolate on my sleeve (oops!). The kitchen smelled like heaven, and I had jazz playing in the background while raindrops tapped against the window. I still smile thinking about that gooey mess, how I accidentally got chocolate on the fridge handle, and how I stood barefoot in my kitchen, tasting the batter like it was a secret I had to keep.
What came out of the oven wasn’t just a dessert—it was pure joy, rich and velvety, like a warm hug on a gloomy day. That first slice cracked ever so slightly on top, but it didn’t matter. It tasted like magic.
I’m writing this Chocolate Cheesecake recipe like I’d jot it down in my little kitchen journal—messy, honest, and full of heart. It’s in my own voice, with all my tiny tips, happy accidents, and a few chuckles along the way. Because baking, to me, is more than just measurements and instructions—it’s a memory in the making, a story you can taste.
Ingredients
I picked simple, top-notch ingredients, because I like my treats rich but not fussy.
For the Crust:
- 24 chocolate sandwich cookies (I once used 30—extra crunchy fun!)
- 5 tbsp unsalted butter, melted
For the Chocolate Cheesecake:
- 1/4 cup hot coffee
- 1 cup bittersweet chocolate
- 3/4 cup semisweet chocolate
- 24 oz cream cheese, room temperature
- 1 pinch salt
- 1 cup sugar
- 1/4 cup sour cream
- 1 tbsp vanilla extract
- 4 large eggs, room temperature
- 3 tbsp all-purpose flour
For the Ganache:
- 1/3 cup semisweet chocolate
- 1/3 cup cream
For the Chocolate Whipped Cream:
- 2 cups heavy cream
- 1/4 cup powdered sugar
- 2 tsp vanilla extract
- 3 tbsp cocoa powder (plus extra if you’re feeling bold)
Preparation Instructions
For the Crust
- I preheat my oven to 350°F (175°C). It wakes up the oven nice and early like an alarm clock.
- I pulse the cookies in my food processor till they’re fine crumbs. One time I forgot the lid—lesson learned!
- I stir in the melted butter until it looks like wet sand. It tickles my fingers just right.
- I press the crumbs into the bottom of a springform pan. I pat it like I’m tucking it in for a nap—nice and even.
- I bake the crust for about 10 minutes until it smells like chocolate heaven. Then I lower the temp to 325°F (163°C) and set it aside. Sometimes I sneak a tiny crumb or two… don’t tell.
For the Filling
- I melt bittersweet and semisweet chocolates with hot coffee in a double boiler. If you use a microwave, do 20-second bursts so you don’t burn it. Been there, burnt-that-chocolate-twice.
- I let the chocolate cool a bit while I get cozy with my mixer and cream cheese. I beat it till it’s silky smooth—no lumps allowed.
- I add sugar and a pinch of salt, then beat until it’s fluffy. I promise, it puffs up like a chocolate cloud.
- I spoon in sour cream and vanilla, mixing till the batter looks like soft, glossy dough.
- I crack in eggs one by one, mixing each time till the batter is just right. If you rush, you’ll get bubbles—nobody wants a holey cheesecake.
- I sift in flour and fold gently so the cake won’t turn into a brick.
- I drizzle in that melted chocolate and swirl until the color is deep, even, and oh-so-tempting.
- I pour everything into my crust and smooth the top with a spatula. I always imagine it’s a chocolate runway.
- I bake at 325°F for 20 minutes, then turn the oven down to 300°F (149°C) and bake 30 more minutes. That slow bake is the secret to creamy magic.
- I turn off the oven and leave the cheesecake in for an hour—patience, my friend, will pay off.
- Finally, I chill it in the fridge overnight. Yes, overnight—sorry, no sneaky midnight slices.
For the Ganache
- I heat cream and chocolate together in a bowl over simmering water. Stir, stir, stir until it’s glossy and smooth.
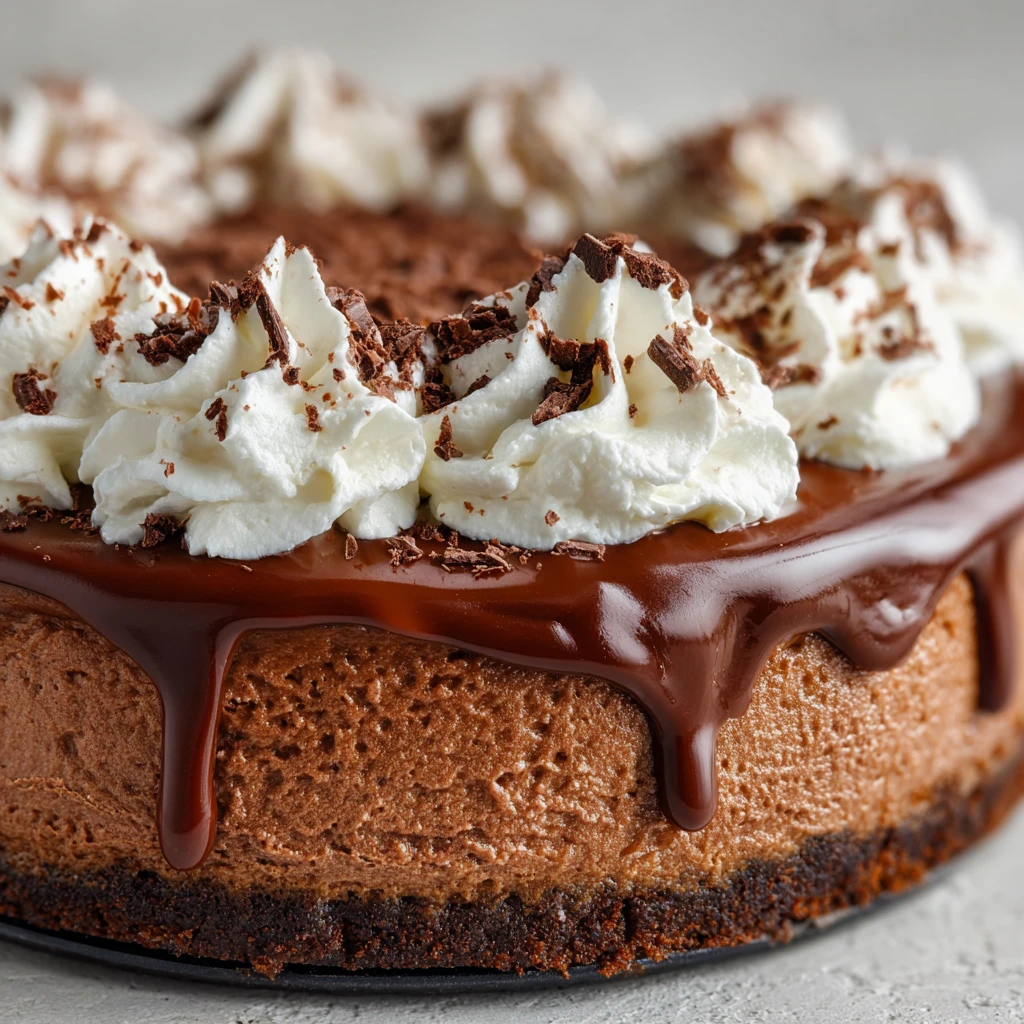
- I pour it lovingly over my chilled cheesecake. It pools at the edges in the prettiest way.
- I pop it back in the fridge for 15 minutes so the ganache firms up. Perfect timing to wash dishes—ugh, my least favorite part.
For the Chocolate Whipped Cream
- I whisk cold heavy cream, powdered sugar, and vanilla on high speed. My arm may ache, but it’s worth it.
- I sift in cocoa powder—no lumps, please—and keep whipping till semi-stiff peaks pop up.
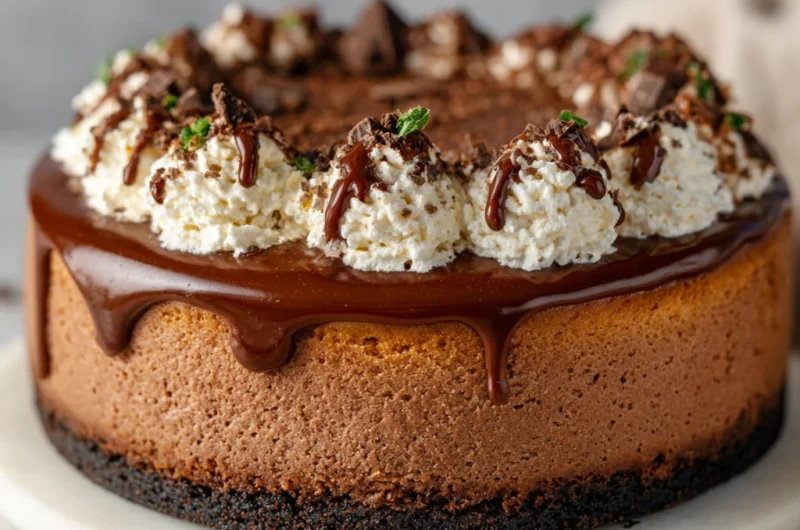
- I fill a piping bag and adorn the cake with fluffy rosettes. It looks like little chocolate clouds… or marshmallows… or both!
What Makes This Chocolate Cheesecake Special?
I skip the water bath trick—no extra gear, no complicated wrapping, and still, this Chocolate Cheesecake comes out beautifully smooth and crack-free. It’s one less step to fuss over, which means more time to enjoy the baking and less time stressing over the details. Trust me, the slow, gentle bake does the job just fine.
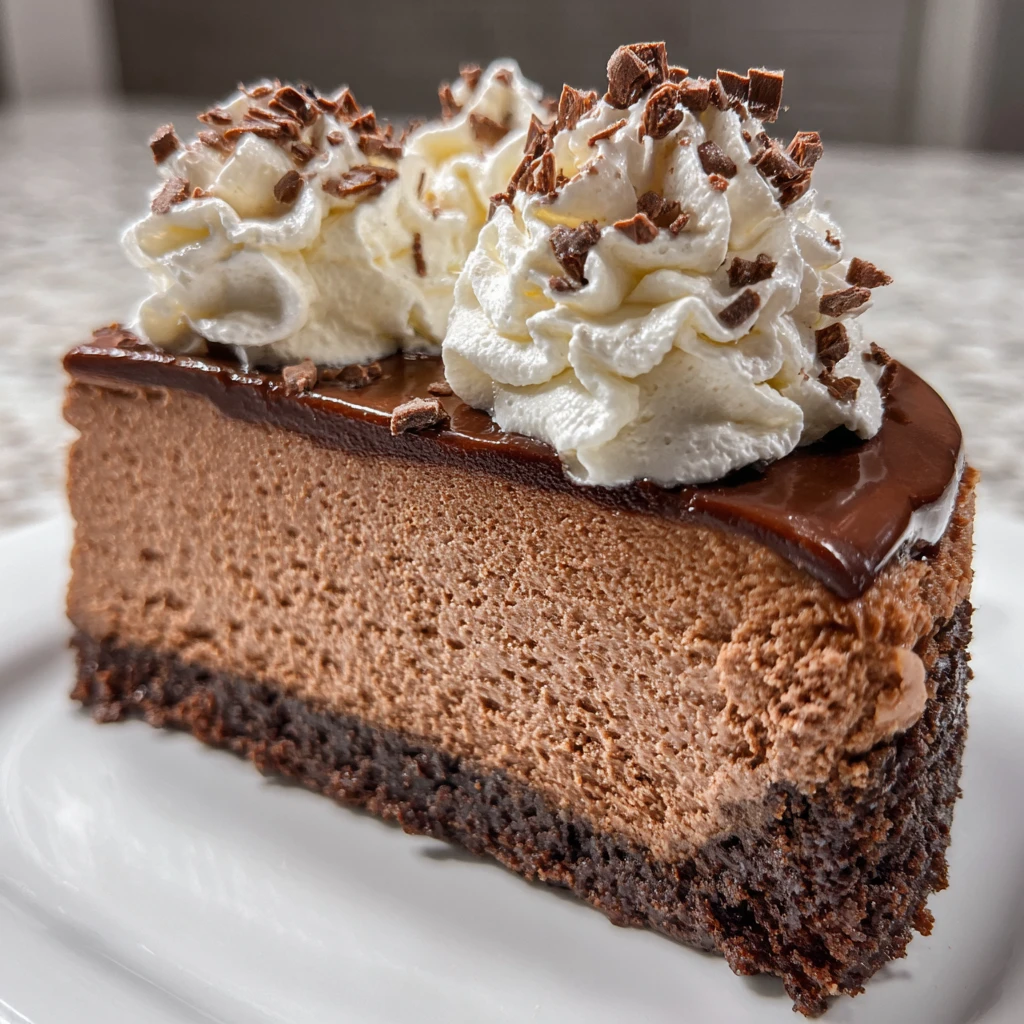
What makes this Chocolate Cheesecake stand out is the mix of bittersweet and semisweet chocolates. Together, they create a rich, layered flavor that’s deep without being overpowering. It’s the kind of chocolate that lingers on your tongue—a little bold, a little sweet, and totally comforting. It’s like a hug in every forkful.
The cookie crust is one of my favorite parts. It adds a fun, crunchy snap that contrasts perfectly with the creamy filling. That bite between the velvety center and the crisp base? Pure texture joy. I sometimes press a few extra crumbs on the sides for a little rustic flair.
Then there’s the ganache—silky, shiny, and just the right amount of indulgent. It turns the Chocolate Cheesecake from a humble home dessert into something you’d swear came straight from a patisserie. When it pools gently at the edges, it’s hard not to take a picture before digging in.
One of the best things? You can freeze slices for up to two months. They’re a lifesaver when a chocolate craving hits out of nowhere, or when you want to surprise a friend with a homemade treat. I always share this little freezer tip: wrap each slice in wax paper, then foil. That way, they don’t stick together, and they stay just as lovely as the day you made them.
So go ahead—bake it now, save a slice (or three) for later, and enjoy a little chocolatey magic whenever you need it.
Serving Suggestions
I like topping each slice with fresh berries—raspberries, strawberries, or even blueberries. They add a beautiful pop of color and just the right bit of zing to cut through the richness. Plus, they make each slice feel a little more special, like it’s dressed up for a party.
A sprinkle of chocolate shavings is my go-to move when I want the dessert to look fancy without putting in too much effort. It gives that “wow, you really went all out!” vibe, even if I was a little lazy and just grabbed a bar of chocolate and a grater at the last minute.
If I’m feeling indulgent, I drizzle warm chocolate sauce over the top right before serving. It melts slightly into the cheesecake and creates this extra gooey, melty moment that’s honestly hard to beat. It’s a little secret trick that makes it feel even more luxurious.
Of course, a generous dollop—or three—of that chocolate whipped cream never hurts. Sure, my waistline might disagree, but my taste buds are all in. It’s fluffy, rich, and just chocolatey enough to make each bite even dreamier.
And if you really want to impress your guests (or just surprise yourself), try tossing on some toasted nuts. Almonds or hazelnuts work especially well. They add a subtle crunch and a warm, nutty flavor that complements the creamy chocolate in the most delightful way.
FAQs about Chocolate Cheesecake
What does Chocolate Cheesecake taste like?
For me, it’s a dance of rich chocolate and creamy tang from the cheese and sour cream. Every bite melts in your mouth, with bittersweet notes playing lead and semisweet singing backup.
Can I freeze Chocolate Cheesecake?
Yes, absolutely. I wrap slices tightly in plastic, then foil, and stash in the freezer. It stays great for two months. Thaw a slice in the fridge overnight and it’s almost as good as fresh.
How long does Chocolate Cheesecake last in the fridge?
I keep mine in an airtight container for up to five days. It tastes best by day three—flavors mellow and mingle, and I swear it gets more delicious.
Can I make Chocolate Cheesecake without a springform pan?
Sure! I once used a regular cake pan lined with parchment paper. It popped out fine. A deep pie dish works, too—just be gentle when removing it.
Conclusion
I hope you try this Chocolate Cheesecake soon—it’s rich, decadent, and worth every minute of love you put into it. You’ll probably laugh at your chocolate-covered fingers, maybe sneak a spoonful of ganache straight from the bowl (we’ve all been there), and savor each creamy bite like it’s a little celebration.
Whether you share a slice with someone special or decide it’s a “me-time” kind of dessert (absolutely no judgment), this Chocolate Cheesecake is more than just a sweet treat—it’s a moment of joy. Bake it for a birthday, a holiday, or just because your day needs a chocolatey hug.
Happy baking, and may your kitchen be filled with sweet aromas, warm memories, and lots of chocolatey smiles. Don’t forget to lick the spoon—chef’s privilege!
Related Recipes to Complement Your Chocolate Cheesecake
Copycat Costco Chicken Bake
A savory and satisfying baked dish inspired by the popular Costco favorite, great for pairing with a rich dessert like chocolate cheesecake.
Loaded Chicken and Potato Casserole
A hearty, comforting main course perfect for a cozy dinner followed by a decadent Chocolate Cheesecake treat.
Party Starter Cheese Ball Recipe
A fun and crowd-pleasing appetizer ideal for gatherings where your Chocolate Cheesecake could be the sweet finale.
Did You Like This Recipe?
There are no reviews yet. Be the first one to write one.
Chocolate Cheesecake Recipe Card
Course: DessertCuisine: AmericanDifficulty: Intermediate12
servings30
minutes1
hour20
minutes660
kcalIngredients
- For the Crust:
2 cups chocolate cookies (crushed into fine crumbs)
5 tbsp melted butter
- For the Filling:
1/4 cup hot coffee
1 cup bittersweet chocolate (chopped)
3/4 cup semisweet chocolate (chopped)
24 oz cream cheese (room temperature)
1 pinch salt
1 cup sugar
1/4 cup sour cream
1 tbsp vanilla extract
4 large eggs (room temperature)
3 tbsp all-purpose flour
- For the Ganache:
1/3 cup semisweet chocolate
1/3 cup heavy cream
- For the Chocolate Whipped Cream:
2 cups heavy cream (cold)
1/4 cup powdered sugar
2 tsp vanilla extract
3 tbsp cocoa powder (plus extra for dusting)
Directions
- Crust
- Preheat oven to 350°F (175°C).
- Mix cookie crumbs and melted butter until it looks like wet sand.
- Press into a springform pan and bake for 10 minutes.
- Lower oven to 325°F (163°C) and set crust aside.
- Filling
- Melt both chocolates with hot coffee in a double boiler or microwave (in short bursts). Let cool.
- Beat cream cheese until smooth.
- Add sugar and salt; beat until fluffy.
- Mix in sour cream and vanilla.
- Add eggs one at a time, mixing just until combined.
- Sift in flour and fold gently.
- Stir in the melted chocolate until fully blended.
- Pour into crust and smooth the top.
- Bake at 325°F for 20 minutes, then lower to 300°F and bake another 30 minutes.
- Turn off oven and leave cheesecake inside for 1 hour.
- Chill in fridge overnight.
- Ganache
- Heat cream and chocolate over simmering water.
- Stir until smooth and glossy.
- Pour over chilled cheesecake.
- Chill again for 15 minutes to set.
- Chocolate Whipped Cream
- Beat cream, powdered sugar, and vanilla until it starts to thicken.
- Add cocoa powder and whip to soft peaks.
- Pipe or spread over the cake. Dust with extra cocoa if desired.