Bake Perfect Black and White Cookies Every Time
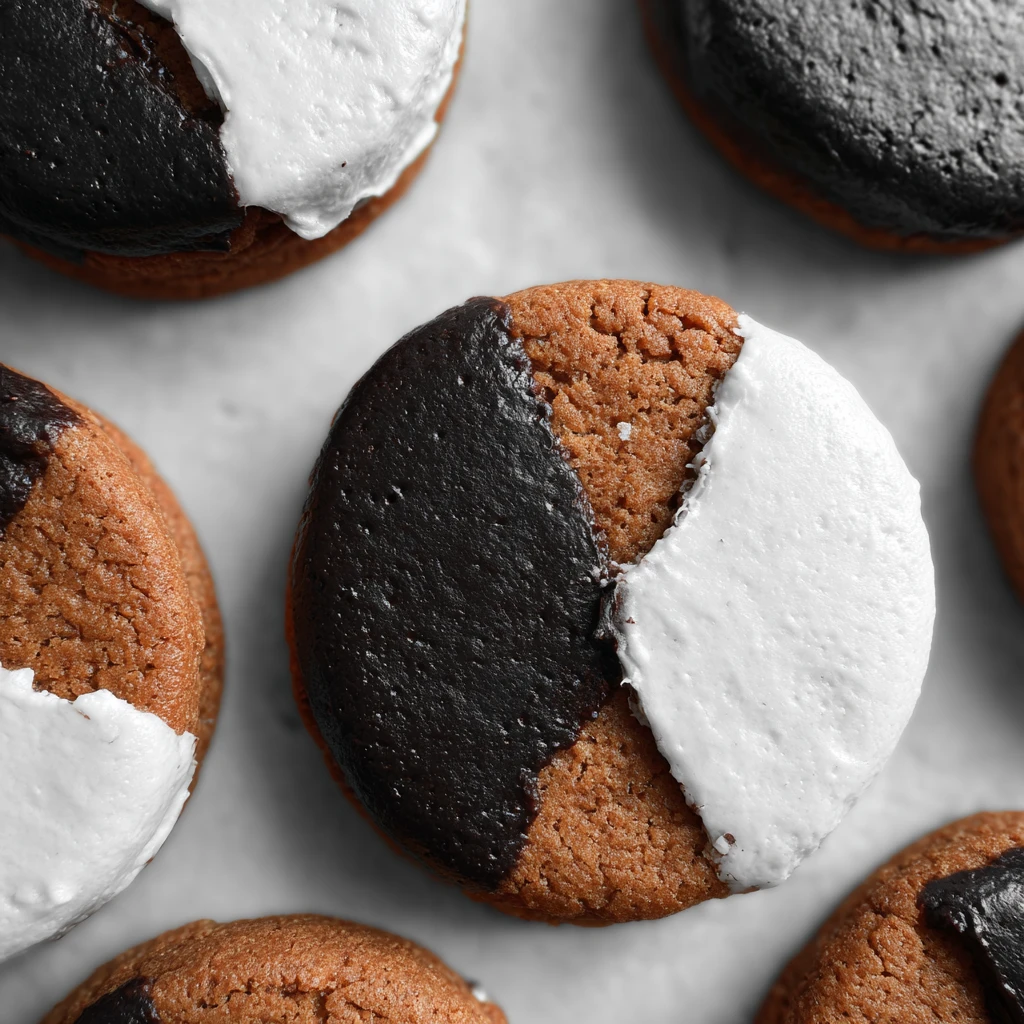
There’s something magical about pulling a tray of fresh cookies out of the oven. The smell fills the room, the warmth lingers in the air, and your patience is tested as you wait for them to cool. For me, black and white cookies capture that feeling perfectly. They’re soft, cake-like, and topped with half chocolate, half vanilla icing—a dessert that feels indulgent but also comforting.
I still remember the first time I tried a black and white cookie in New York. I had just walked out of a busy deli, bagel in one hand and this cookie in the other. The contrast of flavors surprised me—it was like getting two desserts in one. That moment stuck with me, and now, every time I bake these, I feel like I’m recreating a little slice of that memory.
What I love most is their balance. They look fancy enough for guests yet are simple to make with pantry staples. They’re also incredibly versatile—you can make big bakery-style ones or mini versions for bite-sized indulgence. And honestly, once you nail the icing technique, it feels like a small victory in the kitchen.
So let’s roll up our sleeves and get into it. I’ll walk you through why they’re so beloved, what ingredients you’ll need, and how to bake them step by step. Along the way, I’ll share a few tips (and mistakes I’ve made) so your cookies come out just right. 🍪

Why Black and White Cookies Deserve a Spot in Your Kitchen
The irresistible charm
If you’ve ever wondered why these cookies have been around for decades, it’s because they combine the best of everything:
- Soft, cake-like texture that melts in your mouth.
- Dual icing of chocolate and vanilla—you don’t have to choose.
- Nostalgic vibes, especially if you’ve seen them stacked in a deli window.
- Perfect for any occasion, from birthdays to lazy Sunday baking.
I’ve always thought of them as the cookie version of compromise—except it doesn’t feel like a compromise at all. One bite of chocolate, one bite of vanilla, or both together. Every mouthful is different yet equally satisfying.
The memory factor
Food isn’t just flavor; it’s memory. These cookies bring back images of New York diners, cozy family kitchens, or even school bake sales. When I baked them for my niece’s birthday, she loved that she didn’t have to pick between chocolate or vanilla. That’s the joy—they make everyone happy.
Stocking Up: What You’ll Need for Baking Success
The ingredient checklist
Before we begin, make sure you’ve got everything handy. Here’s your lineup:
- 1 1/2 cups all-purpose flour
- 1/2 teaspoon baking powder
- 1 teaspoon kosher salt
- 6 tablespoons unsalted butter (room temp)
- 1/2 cup granulated sugar
- 2 tablespoons lemon zest
- 2 teaspoons vanilla extract
- 1 large egg (room temp)
- 1/3 cup buttermilk (room temp)
- 1 tablespoon apple cider vinegar
For the icing:
- 2 cups confectioners’ sugar
- 1 tablespoon lemon juice + 1 tablespoon zest
- 1 tablespoon light corn syrup
- 1 teaspoon kosher salt
- 1/4 cup Dutch-process cocoa powder
This recipe makes around 12–15 cookies, depending on the size.
👉 Tip: If you don’t have buttermilk, mix regular milk with a splash of lemon juice. Let it sit for five minutes, and voilà—instant buttermilk substitute.
From Dough to Glory: How to Bake Black and White Cookies
Step-by-step guide
- Preheat your oven to 350°F (175°C). Line a baking sheet with parchment paper—it saves you from sticky clean-up later.
- Whisk flour, baking powder, and salt together. That dry base gives your cookies structure.
- Cream butter and sugar until light and fluffy. Add lemon zest, vanilla, and egg. This is where the aroma kicks in!
- Alternate adding dry mix and buttermilk to the bowl. Mix gently—don’t overbeat.
- Scoop batter onto the sheet, spacing cookies well. Bake 10–12 minutes until golden.
- Cool them completely on a wire rack. Patience matters here—the icing won’t behave on warm cookies.
- Mix icing ingredients, then split into two bowls: one plain vanilla, one with cocoa powder.
- Frost one half vanilla, one half chocolate. It’s oddly therapeutic to watch them transform.
A few tips from my kitchen
- Measure carefully—baking is precise, not a “wing it” sport.
- Don’t rush cooling. I once iced too soon and ended up with chocolate sliding off the counter. Lesson learned.
- For neat edges, I sometimes use a piping bag. Makes me feel like a pro, even when I’m not.
Result? Cookies that look bakery-worthy but taste even better because you made them.

Mistakes I Learned the Hard Way
Baking can humble you fast. Here are some slip-ups I’ve made (so you don’t have to):
- Overmixing dough → tough cookies instead of soft.
- Scooping flour wrong → packed cups = dry results. Always spoon, level, and don’t shake.
- Icing warm cookies → total meltdown (literally). Let them cool fully.
- Skipping the wire rack → soggy bottoms. Nobody likes that.
Black and white cookies thrive on patience and precision. Rushing kills the magic.
Adding Your Own Twist: Variations and Fun Substitutes
Sometimes I like to play around with recipes. Here are a few ideas:
- Healthier version: Swap buttermilk with Greek yogurt for extra protein.
- Flavor spins: Try orange zest in the batter or lime juice in the icing. Adds a fresh twist.
- Gluten-free option: A 1:1 GF flour blend works surprisingly well.
- Decorations: Sprinkles, nuts, or caramel drizzle—great if you’re baking with kids. 🎉
The fun part is experimenting. Don’t feel boxed into tradition—make these cookies your own.
Curious Questions Answered: Black and White Cookies FAQ
Can I freeze them?
Yes! Wrap them in parchment and freeze in a container. They keep for up to 3 months. Just thaw before eating—no one enjoys rock-hard cookies.
Can I make the dough ahead?
Definitely. Keep it chilled for up to 24 hours, but let it come back to room temperature before scooping. Otherwise, the cookies won’t spread properly.
Butter or margarine?
Always butter. Margarine changes the texture, and honestly, flavor matters here.
How should I store baked cookies?
Use an airtight container. They’re fine at room temp for 3–4 days. If you refrigerate, let them come back to room temp before eating for the best texture.
Are they really from New York?
Yes—born in NYC delis. Eating one feels like being part of that tradition.
Can I add chocolate chips?
Sure, but then it’s no longer classic. Think of it as “black and white with sprinkles of joy.”
How long do they stay fresh?
Around 4–5 days if stored well. Though honestly, they rarely last that long in my house.
👉 Make a double batch if you’re baking for friends. They disappear faster than you think! The first time I brought these to a get-together, I thought a dozen would be more than enough—but they vanished within minutes. Everyone wanted “just one more,” and suddenly the plate was empty.
My Favorite Part: The Joy of Baking These Cookies
Every time I bake black and white cookies, I’m reminded why I love cooking. They’re not complicated, but they make you feel accomplished. There’s something almost magical about watching simple ingredients—flour, sugar, butter—transform into something that feels special.
I remember one rainy Sunday when I baked a batch, and my little brother wandered in mid-icing. He said, “These look like something from a bakery window.” That small comment made all the effort worth it. His smile told me that these cookies were more than just a sweet snack—they were a little piece of happiness.
And that’s the thing about baking: it connects people. Whether you’re sharing them with family, gifting them to a neighbor, or just treating yourself with a cup of tea, black and white cookies carry a sense of nostalgia and comfort. They remind me that food isn’t only about taste—it’s about creating moments, memories, and even a bit of joy in someone’s day.
That’s why these cookies will always hold a special place in my kitchen. They don’t just satisfy a craving—they tell a story, one bite at a time.
Wrapping Up with Sweet Thoughts
In the end, these cookies are more than just a recipe. They’re a tradition, a memory, and a reminder that sometimes the simplest treats are the best.
Baking isn’t about perfection—it’s about creating something with your own hands and enjoying the process. Whether you follow the recipe exactly or add your own flair, this black and white cookie recipe is one worth keeping.
So go ahead, grab your mixing bowl, and bake a batch. Share them, gift them, or keep them all to yourself (no judgment here 😅). Just promise me one thing: take a moment to enjoy the smell, the texture, and that perfect balance of chocolate and vanilla.
Related Recipes to Complement Your Black and White Cookies
Banana Bread Chocolate Chip Cookies
A soft and chewy cookie twist that blends classic banana bread flavor with melty chocolate chips.
Soft Peanut Butter Cookies
An easy, melt-in-your-mouth peanut butter cookie recipe that’s perfect for cookie lovers.
Classic Gingerbread Man Cookies
A timeless holiday favorite with warm spices and a fun decorating tradition.
Did You Like This Recipe?
There are no reviews yet. Be the first one to write one.

Black and White Cookies Recipe Card
Course: DessertCuisine: AmericanDifficulty: Medium12
servings20
minutes12
minutes210
kcalIngredients
1 ½ cups all-purpose flour
½ tsp baking powder
1 tsp kosher salt
6 tbsp unsalted butter, room temp
½ cup granulated sugar
2 tbsp lemon zest
2 tsp vanilla extract
1 large egg, room temp
⅓ cup buttermilk, room temp
1 tbsp apple cider vinegar
- Icing
2 cups confectioners’ sugar
1 tbsp lemon juice + 1 tbsp zest
1 tbsp light corn syrup
1 tsp kosher salt
¼ cup Dutch-process cocoa powder
Directions
- Preheat oven to 350°F (175°C). Line a baking sheet.
- Whisk flour, baking powder, and salt.
- Cream butter and sugar. Add lemon zest, vanilla, and egg.
- Add dry mix and buttermilk alternately. Mix gently.
- Scoop batter onto sheet, leaving space.
- Bake 10–12 mins until golden. Cool on wire rack.
- Mix icing: split into vanilla and chocolate bowls.
- Frost each cookie half vanilla, half chocolate.