The Recipe Behind the Perfect Key Lime Pie
I still remember the first time I took a bite of a key lime pie. It was a summer afternoon in Key West, the air smelled of salt and sunshine, and my aunt had just pulled a homemade pie from the fridge. The first spoonful? A perfect mix of tangy citrus and creamy sweetness, with a crunchy, buttery crust that melted in my mouth. ☀️ That moment stuck with me — a dessert that somehow feels like vacation.
Years later, I started recreating it myself. Every time I bake one, I’m reminded that some recipes are more than just food — they’re memories you can taste. And if there’s one dessert that deserves a permanent spot in your recipe book, it’s this one. Whether you’re new to baking or you’ve been whipping up treats for years, this key lime pie recipe is one of those effortless show-stoppers that always impresses.
By the end of this guide, you’ll know exactly how to make it, how to avoid common mistakes, and how to add your own twist. Ready to bring a bit of sunshine into your kitchen? Let’s go 🌿
Why You’ll Fall in Love With This Key Lime Pie
If you’ve never made a key lime pie recipe before, trust me — this one will change your dessert game forever. Here’s why it’s such a gem.
- It’s ridiculously easy. You only need a handful of ingredients and about 45 minutes of total prep time. No fancy techniques, no complicated gadgets.
- It tastes like summer in every bite. The magic happens when the tartness of key lime juice meets the sweetness of condensed milk. It’s that perfect sweet-tangy balance that wakes up your taste buds.
- It fits every occasion. Dinner with friends, Sunday lunch, birthdays, or just a “treat yourself” evening — this pie never feels out of place.
- Everyone loves it. Seriously, I’ve never met someone who didn’t go for seconds. Even people who “don’t like dessert” somehow finish the whole slice.
Once you try it, you’ll understand why this recipe for key lime pie has been passed down and loved for generations.
What You’ll Need: The Essentials for a Perfect Key Lime Pie
Before diving in, let’s get everything ready. Having your ingredients prepped makes the process smoother (and honestly, more relaxing).
For the Crust
- 12 full sheets of graham crackers (crushed finely)
- 2 tablespoons granulated sugar
- 6 tablespoons melted unsalted butter
For the Filling
- 2 large egg yolks
- 1 (14 oz) can of sweetened condensed milk
- ½ cup of key lime juice (fresh is best — but bottled works in a pinch)
- 1 tablespoon of grated lime zest, plus a bit more for garnish
For the Whipped Cream Topping
- 1 cup heavy cream
- 2 tablespoons powdered sugar
Quick Snapshot
- Prep time: 30 min
- Baking time: 15 min
- Servings: 8 slices
- Calories: ~385 per serving
💡 Tip: Always zest your limes before squeezing them — I learned this the hard way once and let’s just say zesting a squished lime is a nightmare!
Let’s Bake Together: Step-by-Step to the Dreamy Key Lime Pie
This is where the fun begins. Making this pie feels almost therapeutic — every step has its little satisfaction.
Step 1: Build the Crust
Start by preheating your oven to 325°F (163°C).
Then, crush your graham crackers. I usually toss them in a food processor, but when I didn’t have one, I’d use a plastic bag and a rolling pin. (Bonus: it’s oddly stress-relieving 😅). Mix the crumbs with sugar and melted butter until everything’s coated and crumbly.
Press the mixture evenly into your pie pan — the bottom and a bit up the sides. Don’t stress about perfection; the rustic look has charm. Bake for about 10–12 minutes, just until set, and then let it cool completely.
Step 2: Mix the Filling
In a mixing bowl, beat the egg yolks until they’re light and fluffy. You want a pale yellow color. Then, pour in the sweetened condensed milk, key lime juice, and lime zest. Stir gently until smooth and creamy.
The aroma at this stage? Heavenly. I swear it smells like sunshine and good vibes.
Step 3: Bake That Beauty
Pour the filling into your cooled crust and smooth it out. Pop it into a 350°F (177°C) oven for about 15 minutes. When it’s done, it should still be slightly jiggly in the center — that’s the secret to the perfect texture.
Let it cool to room temperature before refrigerating it for at least 3 hours. (I usually prepare mine the night before — it’s even better the next day.)
Step 4: The Finishing Touches
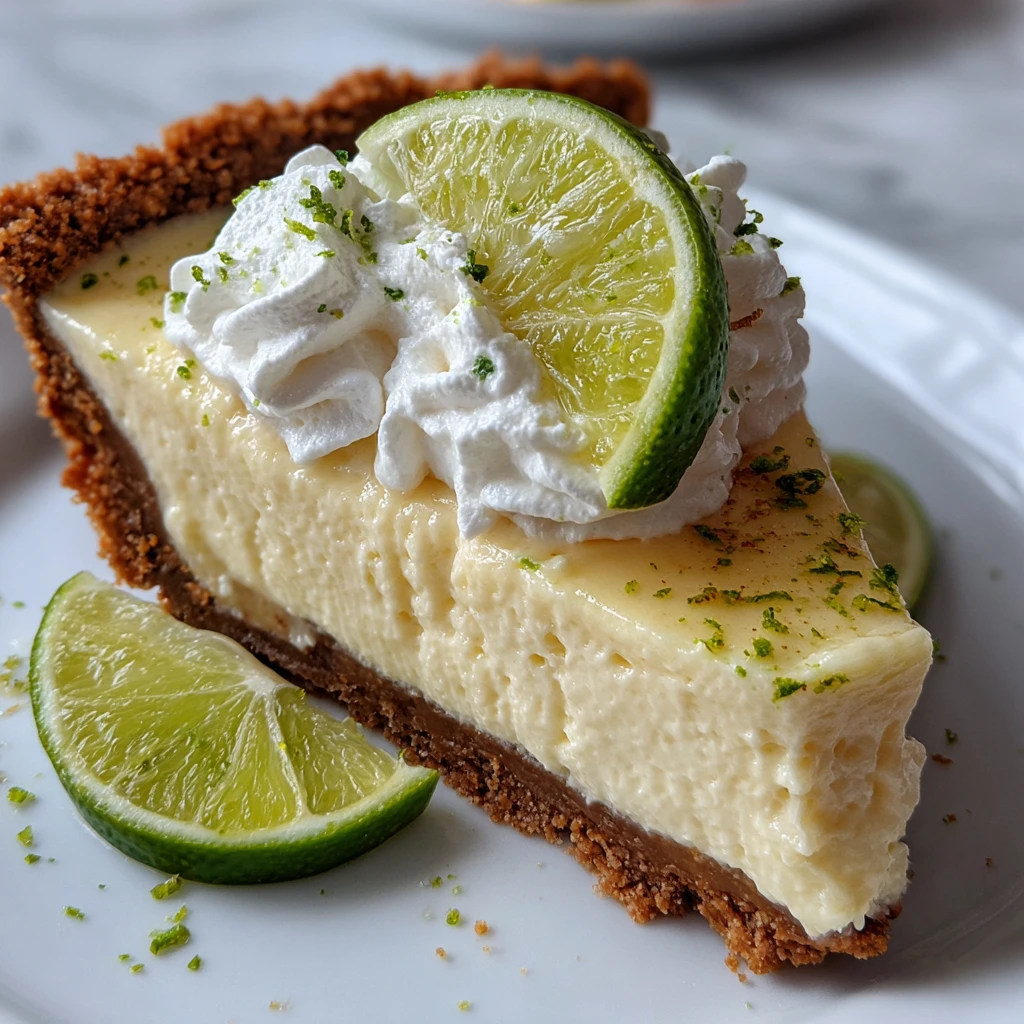
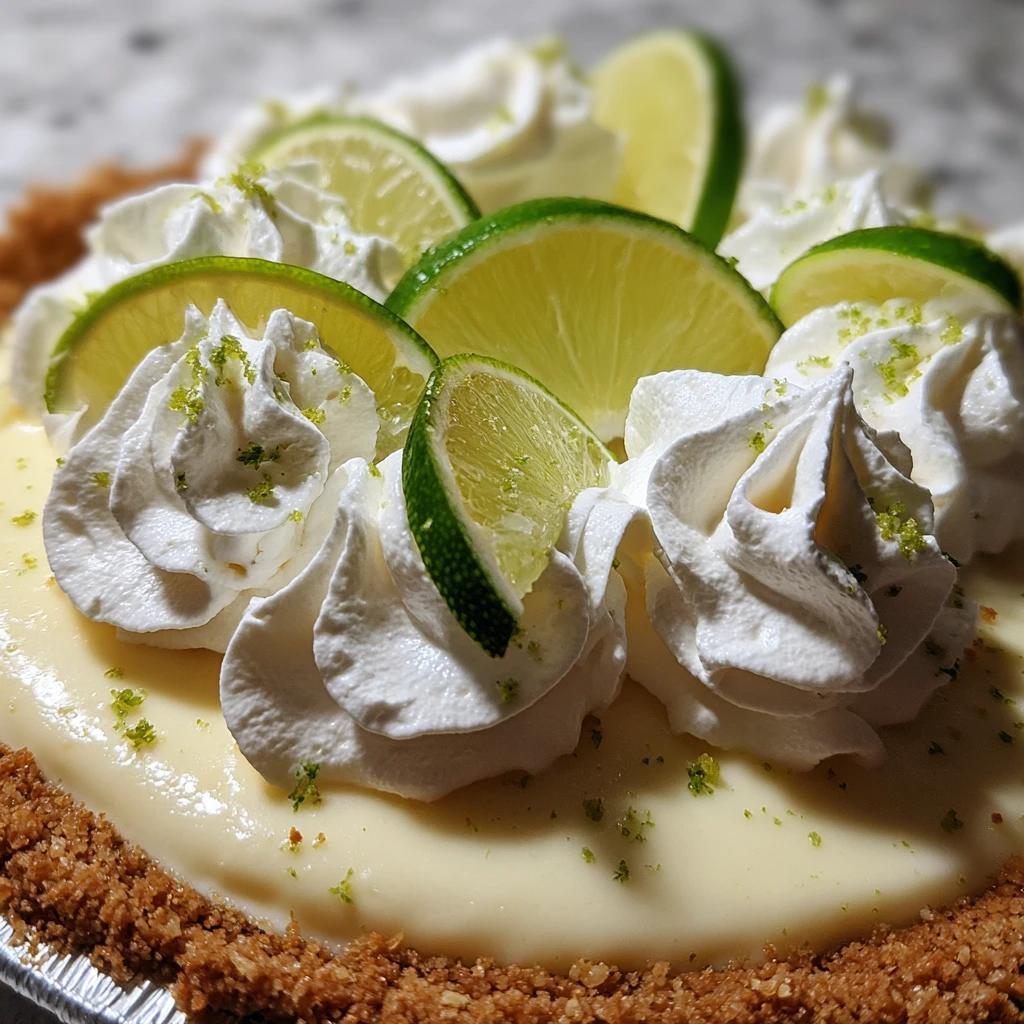
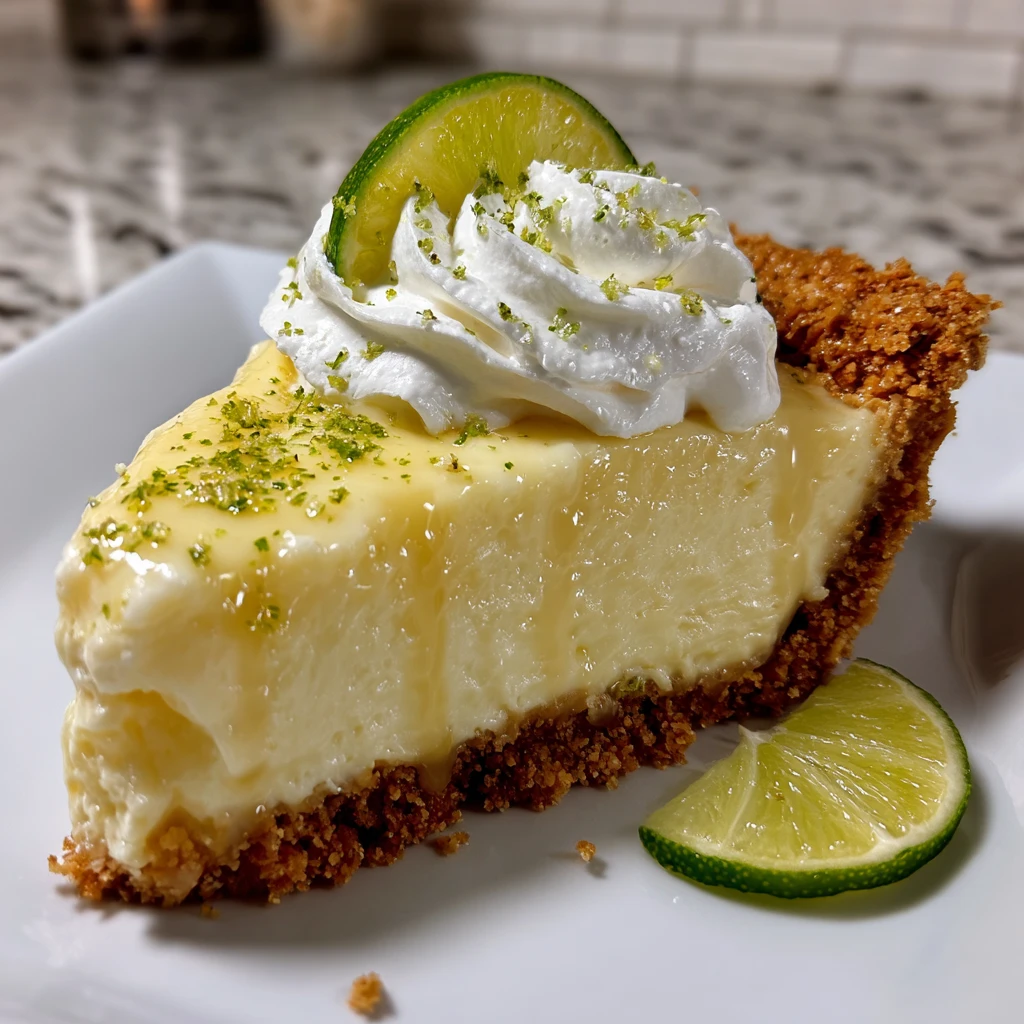
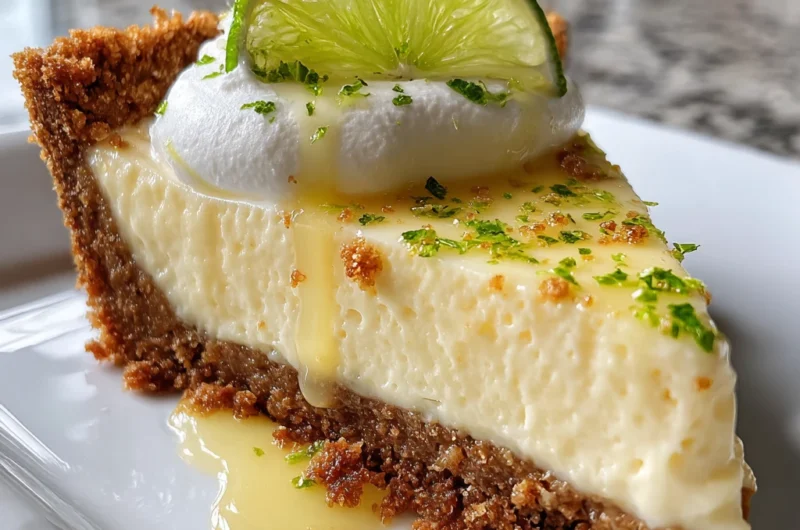
Whip your heavy cream with powdered sugar until soft peaks form. Spread or pipe it generously over the pie, then sprinkle some extra zest or add a few thin lime slices for decoration.
Take a step back, admire your work, and get ready to wow everyone at the table.
What Not to Do: Avoid These Common Key Lime Pie Mistakes
I’ve made this pie dozens of times, and believe me, I’ve learned some lessons the messy way. Here’s how to avoid the classic blunders:
- Overbaking – The filling should wiggle, not wobble violently. If it’s too firm, you’ve gone too far.
- Skipping the chill time – This step sets the filling. If you skip it, you’ll end up with a runny mess instead of creamy perfection.
- Using regular limes – You can use them, but they lack that signature tart punch that real key limes give.
- Forgetting the whipped cream – It’s not optional. The cream’s sweetness balances the citrus tang — without it, it’s just not the same.
✨ Mini tip: I sometimes add a pinch of sea salt to the crust mixture. It subtly enhances the sweetness and gives the flavor more depth.
When You’re Missing Ingredients: Smart Substitutions
Life happens — sometimes you open the fridge and realize you’re short on something. No panic. Here are my go-to swaps for this key lime pie recipe:
- No key limes? Use Persian limes. The taste is slightly less sharp but still delicious.
- No condensed milk? Coconut cream makes a great dairy-free alternative. It adds a hint of coconut that’s tropical and surprisingly harmonious.
- No graham crackers? Try digestive biscuits, crushed vanilla wafers, or even almond flour for a gluten-free crust.
It’s amazing how flexible this dessert is. Once, I even made it in mini jars for a picnic — no slicing, no plates, and everyone loved them! 🥧
Your Key Lime Pie Questions, Answered
I get a lot of questions whenever I share this recipe, so here’s a little FAQ just for you:
1. Can I use margarine instead of butter? You can, technically — but please don’t. Butter is what gives the crust its rich flavor. Margarine will make it taste… flat.
2. Do I absolutely need key limes? They’re the heart of this dessert. But if you can’t find them, regular limes are okay. Just add a bit more zest to amp up the flavor.
3. Can I freeze my key lime pie? Yes! Freeze it without the whipped cream topping. When you’re ready to serve, let it thaw in the fridge for a few hours and then decorate.
4. How do I know it’s baked enough? If the edges are firm and the center has a slight jiggle, you’re golden. It’ll continue to set while cooling.
5. How far ahead can I make it? You can make it up to 3 days in advance, which makes it perfect for planning ahead. Keep it chilled and covered.
6. Any creative toppings besides whipped cream? Oh, definitely! Try toasted meringue for a café-style vibe, or fresh berries for a colorful twist. A drizzle of chocolate syrup also pairs surprisingly well.
7. Is it gluten-free or dairy-free? The traditional one isn’t, but with simple swaps — gluten-free cookies or coconut cream — you can make it fit most diets without losing flavor.
👉 Fun fact: Key lime pie became Florida’s official state pie in 2006 — talk about well-deserved fame!
Taking the First Bite: Savoring the Moment
There’s something so special about that first forkful — the creamy filling, the crumbly crust, the cool whipped cream melting together. It’s a dessert that makes everyone pause for a second.
Whenever I serve it, someone always asks for the recipe, and I love seeing their surprise when I say, “It’s super easy!” That’s the magic of key lime pie recipes — minimal effort, maximum joy.
So, next time you want to make something memorable, skip the complicated pastries and go for this sunny classic. It’s a guaranteed win, every single time.
Conclusion: A Little Sunshine in Every Slice
Key lime pie isn’t just a dessert — it’s a feeling. It’s summer afternoons, laughter around the table, and the joy of something homemade. With just a few ingredients and a bit of patience, you can create your own slice of paradise.
So go ahead, grab those limes, preheat the oven, and get whisking. You’ll not only make an incredible pie but also a memory worth keeping. 💛
Related Recipes to Complement Your Key Lime Pie
The Lemon Meringue Pie That Wins
A bright and citrusy pie with a fluffy meringue topping, perfect for fans of tart, refreshing desserts.
Homemade Strawberry Pie
A fruity, fresh summer pie that shares the same light, crowd-pleasing spirit as key lime pie.
The Ultimate Pecan Pie Recipe
A rich, nutty dessert that contrasts nicely with the light citrusy tone of key lime — great for seasonal pie roundups.
Did You Like This Recipe?
There are no reviews yet. Be the first one to write one.
Key Lime Pie Recipe Card
Course: DessertCuisine: AmericanDifficulty: Easy8
servings30
minutes15
minutes385
kcalIngredients
- Crust:
12 graham cracker sheets, crushed
2 tbsp sugar
6 tbsp melted butter
- Filling:
2 egg yolks
1 can (14 oz) sweetened condensed milk
½ cup key lime juice
1 tbsp lime zest
- Topping:
1 cup heavy cream
2 tbsp powdered sugar
Directions
- Preheat oven to 325°F (163°C).
- Mix crushed crackers, sugar, and butter.
- Press into pie pan and bake 10–12 mins. Cool.
- Beat egg yolks until light. Add condensed milk, lime juice, and zest. Mix well.
- Pour filling into crust. Bake at 350°F (177°C) for 15 mins.
- Cool, then chill 3 hours.
- Whip cream with powdered sugar.
- Spread on pie and garnish with lime zest or slices.